Scholarly:Documentation
From MtTWiki
Overview
Content types
Scholarly comes with eight build in Content types
- Blog entry
- Course
- Event
- Faculty
- Feature
- Slideshow entry
- Student
- Testimonial
Of course Scholarly also supports the rest of Drupal's default content types: Article and Basic page as well as the Webform content type.
Blog entry
A Blog post, similar in form to a story, is ideal for creating and displaying content that carries images and informs or engages website visitors. Press releases, site announcements, and informal blog entries may all be created with a blog post entry. By default, a blog post entry is automatically featured on the site's initial home page, and provides the ability to post comments. It has the option to be displayed into front page slide show. It provides the ability to attach an image which is automatically adjusted to fit into the websites layout. Blog post enables free tagging (just like labels), taking the taxonomy one step further.
Course
A Course post is ideal for posting new courses, classes, seminars or similar. A Course can be displayed in the front-page slideshow. It also comes with the capability of attaching an image which is automatically adjusted to fit into the website layout. What’s particularly cool about a Course post, is that it provides the ability to attach a series of images, thumbnails of which are automatically created and adjusted to fit into the website layout.
Event
An Event post is ideal for posting new events online or on-site. An Event can be displayed in the front-page slideshow. It provides the ability to attach an image which is automatically adjusted to fit into the websites layout. What’s particularly cool about an Event post, is that it provides the ability to attach a series of images, thumbnails of which are automatically created and adjusted to fit into the website layout. Event post comes with build in Google Maps support.
Faculty
A Faculty post is ideal for adding new faculty members, along with their contact details and associated information e.g.: courses they teach, expertise and research interests etc.
Feature
A Feature post is ideal for highlight features or sections of your offerings. Use it to promote any page or URL into any page of your website. What’s particularly cool about a Feature post, is that it can carry a title, a teaser and a font-awesome icon linking to an internal path or external link. Also it provides the ability to attach an image which is automatically adjusted to fit into the websites layout. Lastly it provides the ability to attach a series of images, thumbnails of which are automatically created and adjusted to fit into the website layout.
Slideshow entry
A Slideshow entry is ideal for creating commercial banners as well as messages for your website. Use it to promote any page of your website or URL into the front page slide show. It can carry a title, a teaser and an image linking to an internal path or external link.
Student
Use for adding new students, along with their contact details and associated information e.g.: programs they participate in, study and research interests etc.
Testimonial
The Testimonial entry is perfect to showcase the words of love from your users and customers. Use it to easily publish testimonials on your site. A special View Block and a View Page are already configured to show them off perfectly.
Image handling
Scholarly comes with pre-configured image presets ready to be used. All the content types, Blog entry, Course, Event, Feature and Slideshow entry make use of this and produce all necessary thumbnails and other derived images.
Just upload your images and Scholarly will use them for the Front Page and any other place where a derived image is needed.


Pre-configured Blocks
Scholarly comes with a set of pre-configured ready-to-use blocks and view blocks:
Front page Slideshow
This view block collects and displays the promoted to front page Slideshow Courses, Events, Blog entries, Articles and Slideshow entries.

Features
This view block collects and displays all the Feature entries.

Course Highlights
This view block collects and displays the promoted to front page Course entries. This block is by default assigned into a quicktabs block.

Hot Events
This view block collects and displays the promoted to front page Event entries. This block is by default assigned into a quicktabs block.

Featured Articles
This view block collects and displays the promoted to front page & sticky at top of list Articles and Blog entries. This block is by default assigned into a quicktabs block.

Latest News & Announcements
This view block collects and displays the promoted to front page Articles and Blog entries.

Campus Event Calendar
This view block collects and displays the latest Events.

Featured Students
This view block collects and displays the promoted to front page Student entries. This block is by default assigned into a quicktabs block.

Featured Teachers
This view block collects and displays the promoted to front page Faculty entries. This block is by default assigned into a quicktabs block.

Testimonials
This view block collects and displays the latest Testimonial.

Twitter Updates
Connects with a given twitter account and displays automatically the latest tweets.

Follow us on social media
Ready made, html block with eye-candy social icons.

Subscribe to our Newsletter

Google Map
This block displays the corresponding Google map configured through the theme settings.

Contact info

This block allows you to share the current page to Facebook, Google+ or Twitter.

How to
Add a new Blog entry
- Select "Add Content" and click on the "Blog entry" content type
- Enter a title
- Enter the Subheader body
- Enter the body text
- Upload as many images as you like
- Upload a teaser image and enter the Teaser text
- If you want the teaser image to be displayed as the image banner enable the "Use as main image banner" checkbox.


Add a new Course
- Select "Add Content" and click on the "Course" content type
- Enter a title
- Enter the Subheader body
- Upload as many images as you like
- Optionally enter the course summary
- Enter the body text
- Enter the resourses for the current course
- Enter the current tutor of the course
- Upload a teaser image and enter the Teaser text
- If you want the teaser image to be displayed as the image banner enable the "Use as main image banner" checkbox.


Add a new Event
- Select "Add Content" and click on the "Event" content type
- Enter a title
- Enter the Subheader body
- Upload as many images as you like
- Enter the date and the location of the event
- Enter the coordinates of the event's location. This coordinates are needed for the Map of the event.
- Enter the Event summary text
- Enter the body text
- Enter the related resources for the current event
- Enter the event contact information
- Upload a teaser image and enter the Teaser text
- If you want the teaser image to be displayed as the image banner enable the "Use as main image banner" checkbox.


Add a new Faculty
- Select "Add Content" and click on the "Faculty" content type
- Enter a title
- Enter the Subheader body
- Enter the Academic title of the faculty
- Upload the photo of the faculty
- Enter the body text
- Upload the CV and the websites of the current faculty
- Enter the contact information, the honors, recent publications and the email
- Enter the URL of the Twitter profile and the URL of the Linkedin profile of the faculty.


Add a new Feature
- Select "Add Content" and click on the "Feature" content type
- Enter a title
- Enter the Subheader body
- If you want to display a Font Awesome icon enter the corresponding classes (http://fortawesome.github.io/Font-Awesome/cheatsheet).
- Enter the path for this feature link. This can be an internal Drupal path such as node/add or an external URL such as http://drupal.org.
- Enter the body text
- Upload as many images as you like
- Upload a teaser image. The teaser image will be displayed as the image banner.


Add a new Student
- Select "Add Content" and click on the "Student" content type
- Enter a title
- Enter the Subheader body
- Upload the photo of the student
- Enter the body text
- Upload the CV of the student
- Enter the supervisor of the student
- Enter the contact information of the student
- Enter the Websites, the recent publications and the email of the student
- Enter the URL of Twitter profile and the URL of Linkedin profile of the student.


Add a new Testimonial
- Select "Add Content" and click on "Testimonial" link
- Enter a title
- Enter a subtitle
- Enter the Body text

Promote a Feature to the front page Features block
In order to promote a Feature to the front page Features view block you should enable the "Promoted to front page" checkbox of the corresponding node.
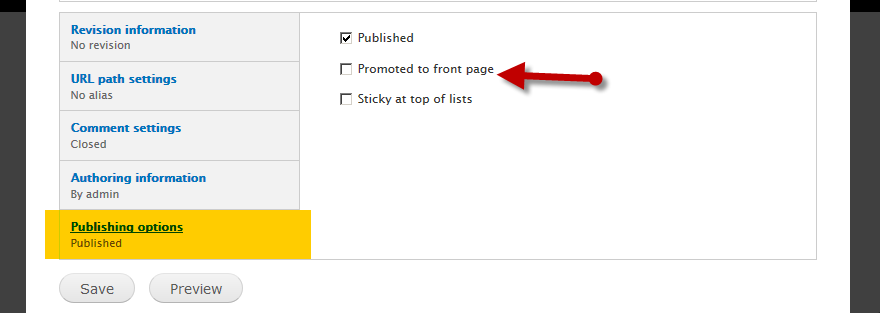
Promote an Article or Blog post to the front page Latest News & Announcements block
In order to promote an Article or Blog entry to the front page Latest News & Announcements block view block you should enable the "Promoted to front page" checkbox of the corresponding node.
Promote an Article or Blog post to the front page Featured articles block
In order to promote an Article or Blog entry to the front page Featured articles view block you should enable the "Promoted to front page" and the "Sticky at top of lists" checkboxes of the corresponding node.

Promote a Course to the front page Course Highlights block
In order to promote a Course to the front page Course Highlights view block you should enable the "Promoted to front page" checkbox of the corresponding node.
Promote an Event to the front page Hot Events block
In order to promote an Event to the front page Hot Events view block you should enable the "Promoted to front page" checkbox of the corresponding node.
Promote a Student/Faculty to the front page Featured Students/Teachers block
In order to promote a Student/Faculty to the front page Featured Students/Teachers view block you should enable the "Promoted to front page" checkbox of the corresponding node.
Publish a post to the front-page slideshow
Course, Event, Article or Blog post
- Create a new or edit an existing Course, Event, Article or Blog entry
- Make sure you have uploaded the Slideshow image using the Teaser image field
- Optionally enter a "Teaser Text" to appear on the slide.
- Check the "Promoted on slideshow" option

Your image will automatically be uploaded and resized to fit in the Slideshow. Your post now is part of the front page Slideshow.
Slideshow entry
- Create a new Slideshow Entry
- Enter the title and upload an image using the Slideshow entry image
- Set the Slideshow entry path. It can also be an external link.
- Make sure the Promoted on slideshow check box is enabled.
- Optionally enter a Teaser Text to appear on the slide.

All customizations regarding the mobile menu can be found at the theme settings.
To change the default responsive menu rendering and display the menu as a select list follow the instruction below.
- Disable the Responsive multilevel menu option in the theme settings
- Enable the sf-Smallscreen plugin in the superfish menu settings of the menu block


The result will look like this
